Install AMPL With Docker
This page provides an option to use Docker to install AMPL. For an alternate way, please see the “Getting Started” Install page.
To install AMPL software using Docker, the major steps are:
Create or Pull a Docker Image
System Requirements
The Docker image will run on Linux / WSL / macOS.
If you don’t have Docker Desktop installed, please follow instructions here.
Once it’s installed, click on the Docker icon to start. Leave it running when using Docker.
You can either pull a prebuilt AMPL image (option 1) or build one yourself (option 2).
Option 1: Pull a Prebuilt AMPL Image from Docker Repo
The simplest method is to download a prebuilt Docker image from DockerHub. For every official AMPL release, a docker image will be pushed to its Docker Hub.
To pull a prebuilt AMPL image, the method varies based on its version.
For a pre-1.6.3 release:
docker pull atomsci/atomsci-ampl:v1.6.2 # Specify a version to pull, ie, v1.6.2.
For 1.6.3 and later, you can download the latest images for various platforms (CPU, GPU, or Linux/ARM64), an example:
docker pull atomsci/atomsci-ampl:latest-cpu # Specify the latest image built for a platform (use those for tags 'cpu', 'gpu', or 'arm')
After that, please follow the instruction from the “Run a Docker Container” step.
Option 2: Build an Image Using Dockerfile
There may be a few reasons why you want to build your own AMPL Image using a Dockerfile. These can include:
You want to customize the install options for your environment,
You want to test a development version/branch to try new features or bugfixes
First clone AMPL github repo, then find the Dockerfile:
git clone https://github.com/ATOMScience-org/AMPL.git
### The following line is _optional_. If you want to check out a development branch instead of the default branch (master).
git checkout 1.6.3                    # (optional) checkout a dev branch, 1.6.3 for example
cd AMPL
Starting from version 1.6.3, a ‘Makefile’ is available that offers various options for building, running, saving, and loading Docker images. Please refer to this doc for more infomation. Here is an example to build a local image:
make build-docker # The default platform is CPU. Use 'PLATFORM=gpu' for GPU or 'ARCH=linux/arm64' for ARM chip platform
This normally takes about 15-20 minutes to build. Once it’s built on your machine, it can be reused.
Note
To build without cache, add “–no-cache” flag after “docker build”.
Run a Docker Container
To see what images are running on your machine, type “docker images”.

Use “docker run … <IMAGE>” command to start the container. The command syntax is:
docker run -it -p <port>:<port> -v <local_folder>:<directory_in_docker> <IMAGE> bash
Use the following example to start the container. For images created or downloaded from version 1.6.3 or later, append ‘bash’ to the end of the docker run command to open a bash session. By default, the container starts with a Python interpreter session.
docker run -it -p 8888:8888 -v ${PWD}:/home atomsci/atomsci-ampl:latest-cpu bash # replace with your <IMAGE>:<TAG>
To get more info for the “docker run” command options, type “docker run –help”:
-i, --interactive                    Keep STDIN open even if not attached
-t, --tty                            Create a pseudo terminal
-p, --publish port(s) list           Publish a container's port(s) to the host
-v, --volume list                    Bind mount a volume
Start the Notebook Server From a Container
To launch the server, you can choose to run using “jupyter-notebook” or “jupyter-lab” using the same port when starting the container. We use “jupyter-notebook” command as examples here:
jupyter-notebook --ip=0.0.0.0 --allow-root --port=8888 &
This will output a message with similar URLs to this:

Connect to the Jupyter Notebook UI From a Browser
Copy and paste the URL from the output message (highlighted in yellow from above) to the browser on your computer. Like this one:

Note
If this doesn’t work, exit the container and choose a different port such as “7777” or “8899” (in all 3 places it’s written), then rerun both commands in “Start a Docker container” and “Start the Jupyter notebook from a container”. Be sure to save any work in your container. See instructions on how to “Save work from Docker Jupyter”.
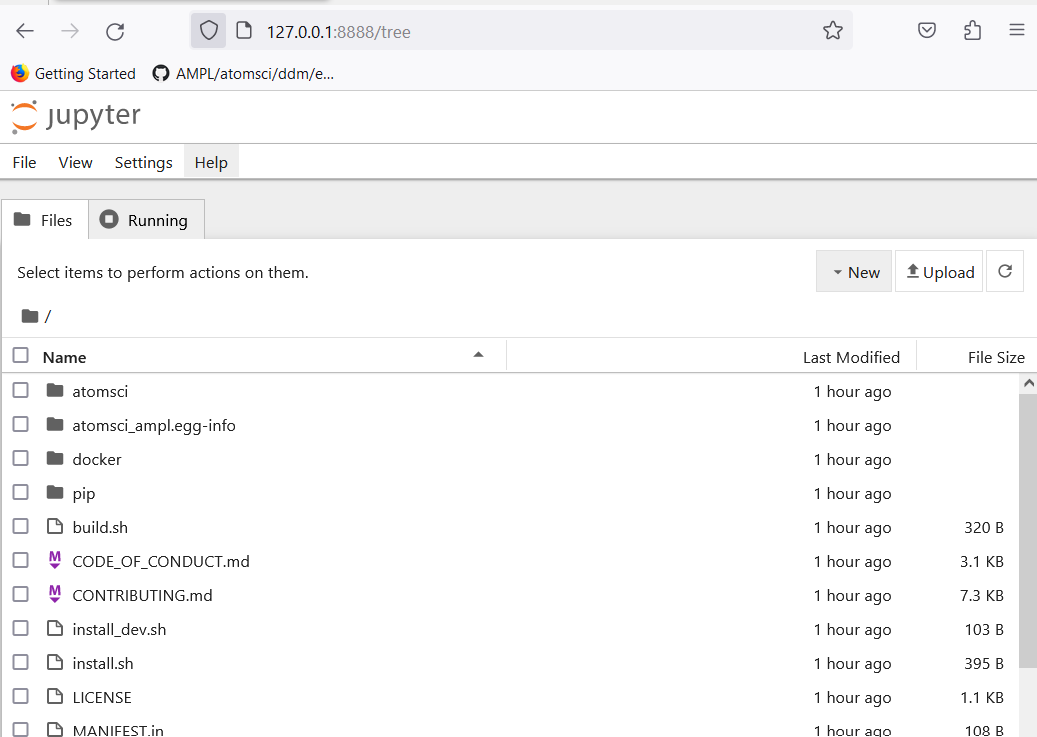
Once connected, you will see a screen like this:
Code Examples
The AMPL code is in:
http://127.0.0.1:<port_number>/tree/AMPL/atomsci/ddm/
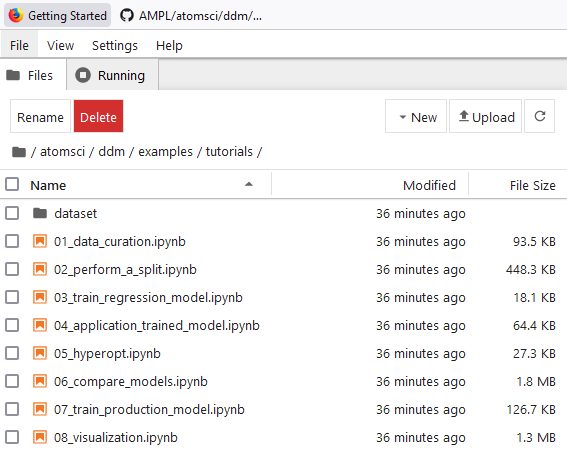
The tutorials examples are in:
http://127.0.0.1:<port_number>/tree/AMPL/atomsci/ddm/examples/tutorials
Note
“<port_number>” is the number that you used when starting “docker run -p …”.
Here’s a screenshot of the AMPL tutorials directory:
Use atomsci-env as the Run Kernel
Note
This section is only applied for images created from version 1.6.2 or earlier.
In order to use AMPL Framework, select “atomsci-env” as the run kernel for the notebook. This should be set during image creation. In case it’s not set, or if you want to verify. Try one of the following:
From an existing notebook, top menu bar “Kernel” > “Change Kernel” > “atomsci-env”
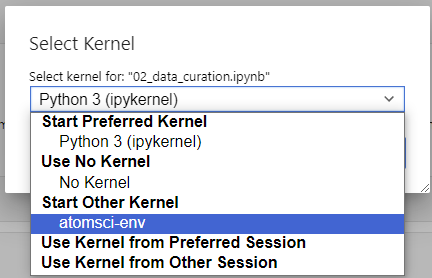
From a new notebook, click “File” > “New” > “Notebook” menu, and select atomsci-env as the run kernel

Save Work From Docker
A Docker container is stateless. Once you exit, the work will not persist. There are a couple of ways to save your files:
From the browser Jupyter Notebook page menu, “File” -> “Download” to download the file(s).
Use mount. When you start the Docker with “-v” option:
docker run -it -p <port>:<port> -v <local_folder>:<directory_in_docker> <IMAGE>
It binds the <local_folder> with <directory_in_docker> , meaning that the file(s) in <directory_in_docker>, will be available in <local_folder>.
For example:
Run the docker with “-v” to bind the directories
docker run -it -p 8888:8888 -v ~:/home atomsci-ampl # <local_folder> -> "~", <directory_in_docker> -> "/home".
Save, copy the file(s) to <directory_in_docker>
root@d8ae116b2a83:/AMPL# pwd
/AMPL
root@d8ae116b2a83:/AMPL# cp atomsci/ddm/examples/02_perform_a_split.ipynb /home
The file(s) will be in the <local_folder>.
Useful Docker Commands
docker run --help                              # get help messages
docker ps -a                                   # check docker processes
docker images                                  # list local docker images
docker rmi <image>                             # remove an image
docker cp file.txt <container_id>:/file.txt    # copy from local to container
docker cp <container_id>:source_path dest_path # copy from container to local
Troubleshooting
Problem with token
If you try to connect the Jupyter Notebook URL, but got a prompt for password or token, go to the docker terminal, type in
jupyter server list

And copy the string after “token=” and paste that, then click “Log in”